Setting up a static blog with Github Pages
I wanted to start blogging recently, it’s been sometime since I created a blog so I’ve done some research to get started. There is a plethora of ready to use blogging platforms available and older ones like Blogger and Wordpress are never been more easier before.
In the end, I decided to go with static blog created by Jekyll and hosted on Github Pages.
Why going back to bare metal static html ?
- Zero maintenance !! Write, push/publish and forget.
- No worries about server management/security.
- Zero bucks required if hosted with Github, save that monthly $10 server bill for beer
 .
. - Performance is blended in by nature, forget about query optimisation/pruning/indexing or whatever.
- Inherently simple architecture, everything is just HTML and some markup that’s it.
- Plenty of plugins for features requiring a backend, like using Disqus for user interaction/comments.
I still need some kind of server to handle web traffic and serve HTML right ? Now that’s where
Github Pages🥁 comes in, you just have to provide static HTML/Markup
files Github will host that free of cost, and deals with traffic management(Unlimited bankwidth), redirection and HTTPS.
All hail ![]() .
.
How to create one for yourself (Get it up in 25 minutes or less !! )
- Create a Github repository with
your-username.github.ioand create directory namedyour-usernamein your local.- Add Github remote to your local repo.
- Setting up blog structure,
- You can either use handcrafted html files or use a static CMS like Jekyll(recommended) to manage your blog.
- If you prefer to create your own HTML with CSS/JS then add/commit those files to repository and push to
masterbranch. - If you are opting for Jekyll, install Jekyll with their
installation doc, then
build your blog, commit and push it to master branch of
your-username.github.iorepository we created. - Go to settings page of
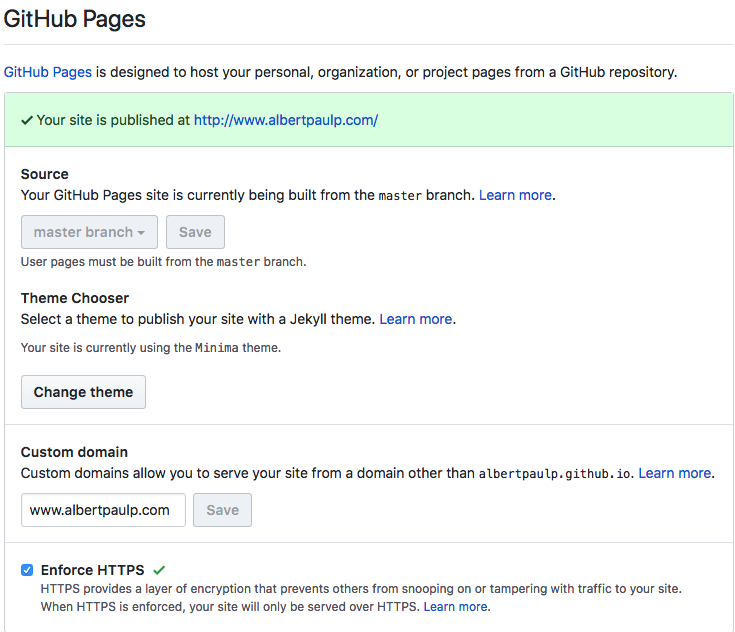
your-username.github.iorepo, it should say something like “Your site is published atyour-username.github.io“. You can try that link in your browser and make sure site is up and running.
- Adding a custom domain,
- We can connect our custom domain to GitHub hosted page using 2 mechanisms(there are other options as well, but sake of simplicity), either using A records or CNAME.
- I would prefer using CNAME mechanism due to various advantages over A Records.
- In order to add CNAME to your new domain, find Domain management console or get help from registrar for the right place to add CNAME.
- I use
www.albertpaulp.comsubdomain as entrypoint to my blog, if you want similar configuration, Add CNAME with host asyour-domain.comand value asyour-username.github.io, also addwww.your-domain.com(notice I’ve addedwww) and value asyour-username.github.io. In a nutshell, you just told your domain registrar where to send traffic if somebody typed in your custom domainyour-domain.com. - Now create a file named CNAME(full caps without any extension) in your repo and add
www.your-domain.comas plain text content, this is for Github to match your local page with custom domain. See CNAME of this blog. - That’s it, done. Now wait for DNS Propagation, it can take up to a day max, usually this is done in 1 - 2 hours.
- Adding a free SSL certificate with Let’s Encrypt !
- If you ever had to manually setup a Let’s Encrypt certificate on your server, you won’t believe how easy to set up HTTPS for your custom domain here, it’s as simple as clicking “Enforce HTTPS” button in your repository settings.
Once everything is done, it’ll look something like this,
Enjoy your new shiny, slick and secure blog !! ![]()